SharedPreferences是Android中一个轻量级的存储类,常用于保存app的配置数据,例如登录凭证等。通过生成
.xml文件来保存数据,数据存放于/data/data/<Package Name>/shared_perfs目录下。
使用方法
存储数据
使用SharedPreferences存储数据时,首先要获取SharedPreferences对象,然后通过该对象获取到Editor对象,最后调用调用Editor对象的相关方法存储数据。具体代码如下所示:
SharedPreferences sharedPreferences=getSharedPreferences("user",Context.MODE_PRIVATE);
        Editor editor=sharedPreferences.edit();
        //存入数据
        editor.putString("username","admin");
        editor.putString("password","123456");
       //提交数据
editor.commit();getSharedPreferences(name,mode)第一个参数name用于指定存储数据的文件名,不用带.xml后缀,保存时会自动补全;第二个参数是指定文件的操作模式,共有四种模式分别为:
MODE_APPEND——追加方式存储MODE_PRIVATE——私有方式存储,其他应用无法访问MODE_WORLD_READABLE——表示当前文件可以被其他应用读取MODE_WORLD_WRITEABLE——表示当前文件可以被其他应用写入
读取数据
使用SharedPreferences存储数据时,只需创建SharedPreferences对像,然后使用该对象从对应的key取值即可。
SharedPreferences sharedPreferences=Context.getSharedPreferences();
        String username=sharedPreferences.getString("username");
        String password=sharedPreferences.getString("password");
删除数据
使用SharedPreferences删除数据时,首先需要获取到Editor对象,然后调用该对象的remove()方法或者clear()方法删除数据,最后提交。remove()方法和clear()方法的区别在于remove()方法只删除某一特定数据,而clear()方法则删除所有数据。
SharedPreferences sharedPreferences=getSharedPreferences("user",Context.MODE_PRIVATE);
        Editor editor=sharedPreferences.edit();
        editor.remove("username");
        editor.clear();
        editor.commit();
案例内容:
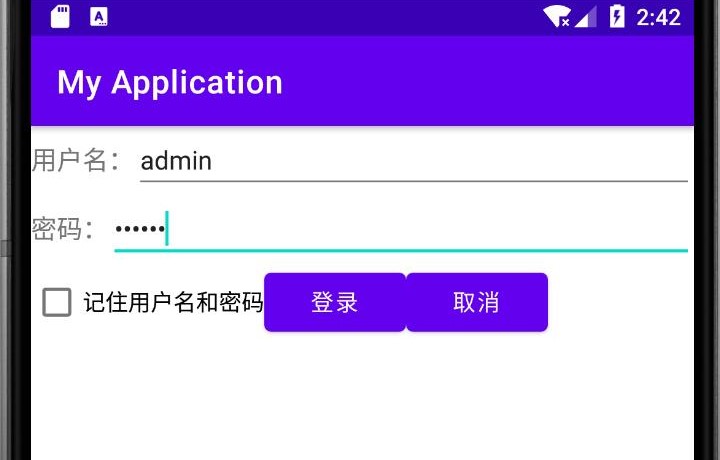
创建一个登录页面,该页面包括两个输入框(用户名,密码),一个复选框(记住账号密码),一个登录按钮,一个取消按钮。当用户输入正确的账号密码后,如果勾选了复选框则将账号和密码利用SharedPreferences类将数据存储起来;如未勾选则将已保存的数据清除。
运行环境
- Windows 10
- Android Studio Arctic Fox (2020.3.1)
- jdk1.7.0_67
具体代码
创建布局
首先我们要明确需要做的主体框架
布局采用的时线性布局,要做成图中的样子,我们必须利用LinearLayout嵌套,父LinearLayout是全局的布局方式,可以看出,下方三个子LinearLayout是按竖直方向排列的,所以全局布局方式应该为线性垂直布局。
子布局①中,有一个TextView(用户名),一个EditText输入框,按水平方向排列,其他两个子布局也一样,所以它们都为线性水平布局,构思好后,敲出代码。
<?xml version="1.0" encoding="utf-8"?>
<LinearLayout xmlns:android="http://schemas.android.com/apk/res/android"
    xmlns:app="http://schemas.android.com/apk/res-auto"
    xmlns:tools="http://schemas.android.com/tools"
    android:layout_width="match_parent"
    android:layout_height="match_parent"
    tools:context=".MainActivity"
    android:orientation="vertical">
    <LinearLayout
        android:layout_width="match_parent"
        android:layout_height="wrap_content"
        android:orientation="horizontal">
        <TextView
            android:layout_width="wrap_content"
            android:layout_height="wrap_content"
            android:text="用户名:"
            android:textSize="16dp"/>
        <EditText
            android:id="@+id/et_username"
            android:layout_width="match_parent"
            android:layout_height="wrap_content"
            android:textSize="16dp"/>
    </LinearLayout>
    <LinearLayout
        android:layout_width="match_parent"
        android:layout_height="wrap_content"
        android:orientation="horizontal">
        <TextView
            android:layout_width="wrap_content"
            android:layout_height="wrap_content"
            android:text="密码:"
            android:textSize="16dp"/>
        <EditText
            android:id="@+id/et_pd"
            android:layout_width="match_parent"
            android:layout_height="wrap_content"
            android:inputType="numberPassword"
            android:textSize="16dp"/>
    </LinearLayout>
    <LinearLayout
        android:layout_width="match_parent"
        android:layout_height="wrap_content"
        android:orientation="horizontal">
        <CheckBox
            android:id="@+id/cb_pd"
            android:layout_width="wrap_content"
            android:layout_height="wrap_content"
            android:text="记住用户名和密码"/>
        <Button
            android:id="@+id/btn_login"
            android:layout_width="wrap_content"
            android:layout_height="wrap_content"
            android:text="登录"/>
        <Button
            android:id="@+id/btn_cancel"
            android:layout_width="wrap_content"
            android:layout_height="wrap_content"
            android:text="取消"/>
    </LinearLayout>
</LinearLayout>
主要代码
我们需要对用户登录时的不同输入情况判断。
在MainActivity中我们敲出主要代码。
package com.example.myapplication;

import android.content.Context;
import android.content.Intent;
import android.content.SharedPreferences;
import android.os.Bundle;
import android.view.View;
import android.widget.Button;
import android.widget.CheckBox;
import android.widget.EditText;
import android.widget.Toast;

import androidx.appcompat.app.AppCompatActivity;

import java.io.File;
import java.util.HashMap;
import java.util.Map;

public class MainActivity extends AppCompatActivity {
    //声明控件
    private EditText user_name;
    private EditText pass_word;
    private CheckBox cbPd;
    private Button btnLogin;
    private Button btnCancel;


    @Override
    protected void onCreate(Bundle savedInstanceState) {
        super.onCreate(savedInstanceState);
        setContentView(R.layout.activity_main);
        initView();
    }

    private void initView() {
        user_name = (EditText) findViewById(R.id.et_username);
        pass_word = (EditText) findViewById(R.id.et_pd);
        cbPd = (CheckBox) findViewById(R.id.cb_pd);
        btnLogin = (Button) findViewById(R.id.btn_login);
        btnCancel = (Button) findViewById(R.id.btn_cancel);
        Map<String,String>user=get_userMes(MainActivity.this);
        String username=user.get("username");
        String password=user.get("password");
        user_name.setText(username);
        pass_word.setText(password);
        //对登录按钮设置监听
        btnLogin.setOnClickListener(new View.OnClickListener() {
            @Override
            //单击登录按钮后执行
            public void onClick(View view) {
                //判断用户名是否输入,如果未输入,提示“请输入用户名”
                if (user_name.length() == 0) {
                    Toast.makeText(getApplicationContext(), "请输入用户名", Toast.LENGTH_SHORT).show();
                } else {
                    //判断密码是否输入,如果未输入,提示“请输入密码”
                    if (pass_word.length() == 0) {
                        Toast.makeText(getApplicationContext(), "请输入密码", Toast.LENGTH_SHORT).show();
                    } else {
                        //如果用户名,密码都已输入,判断用户名密码是否正确
                        //这里我直接设置了一个固定的账号密码(admin,123456)
                        if (user_name.getText().toString().equals("admin")) {
                            if (pass_word.getText().toString().equals("123456")) {
                                //如果账号秘密输入正确,判断复选框是否勾选
                                if (cbPd.isChecked()) {
                                    //若已经勾选,将EditText中输入的数据转换成String类型并读取
                                    //调用下面写的save_userMes方法在app目录中创建一个user.xml,存入读取的数据
                                    String username_str = user_name.getText().toString();
                                    String password_str = pass_word.getText().toString();
                                    boolean flag = save_userMes(MainActivity.this, username_str, password_str);
                                    if (flag) {
                                        Toast.makeText(MainActivity.this, "登录成功,账号信息已保存!", Toast.LENGTH_SHORT).show();
                                    } else {
                                        //其他错误
                                        Toast.makeText(MainActivity.this, "登录出错!", Toast.LENGTH_SHORT).show();
                                    }
                                } else {
                                    //如果为勾选复选框,则直接跳转到登陆成功页面
                                    //并调用remove_userMes方法,删除app目录下已经保存的账号信息
                                    boolean flag =remove_userMes(MainActivity.this);
                                    Toast.makeText(MainActivity.this, "登录成功,账号信息未保存", Toast.LENGTH_SHORT).show();
                                }
                                //登录成功后打开一个新页面
                                Intent intent=new Intent(MainActivity.this,Login.class);
                                startActivity(intent);
                            } else {
                                Toast.makeText(MainActivity.this, "密码错误!", Toast.LENGTH_SHORT).show();
                            }}
                            else{
                                Toast.makeText(MainActivity.this, "账号不存在!", Toast.LENGTH_SHORT).show();
                            }

                        }
                }
            }
        });
        //对取消按钮设置监听,单击后退出应用,System.exit()退出的比finish()更彻底,可以检验数据是否保存
        btnCancel.setOnClickListener(new View.OnClickListener() {
            @Override
            public void onClick(View view) {
                System.exit(0);
            }
        });
    }
    //封装的保存数据方法
    private boolean save_userMes(Context context,String username,String password){
        SharedPreferences sharedPreferences=context.getSharedPreferences("user",MODE_PRIVATE);
        SharedPreferences.Editor editor= sharedPreferences.edit();
        editor.putString("username",username);
        editor.putString("password",password);
        editor.commit();
        return true;
    }
    //封装的清楚数据方法,这里用的是editor.clear();直接清楚所有数据
    private boolean remove_userMes(Context context){
        SharedPreferences sharedPreferences=context.getSharedPreferences("user",MODE_PRIVATE);
        SharedPreferences.Editor editor=sharedPreferences.edit();
        editor.clear();
        editor.commit();
        return true;
    }
    //封装的获取数据方法
    private Map<String,String>get_userMes(Context context){
        SharedPreferences sharedPreferences=context.getSharedPreferences("user",MODE_PRIVATE);
        String username=sharedPreferences.getString("username",null);
        String password=sharedPreferences.getString("password",null);
        Map<String,String>user=new HashMap<String,String>();
        user.put("username",username);
        user.put("password",password);
        return user;
    }
}
登录成功界面
新建一个简单的登录成功界面。
创建一个Login.java
package com.example.myapplication;

import android.os.Bundle;
import android.widget.TextView;

import androidx.annotation.Nullable;
import androidx.appcompat.app.AppCompatActivity;

public class Login extends AppCompatActivity {
    private TextView tv;
    @Override
    protected void onCreate(@Nullable Bundle savedInstanceState) {
        super.onCreate(savedInstanceState);
        setContentView(R.layout.login_layout);
    }
}
写出布局login_layout.xml
<?xml version="1.0" encoding="utf-8"?>
<LinearLayout xmlns:android="http://schemas.android.com/apk/res/android"
    android:layout_width="match_parent"
    android:layout_height="match_parent">
    <TextView
        android:id="@+id/tv"
        android:layout_width="match_parent"
        android:layout_height="match_parent"
        android:gravity="center"
        android:textSize="50dp"
        android:text="登录成功页面"/>

</LinearLayout>
权限设置
对手机存储的使用需要在AndroidManifest.xml中开启权限。
在<application>...</application>之后添加:
<uses-permission android:name="android.permission.WRITE_EXTERNAL_STORAGE"/>由于我们新创建了一个页面,所以还需要在该文件中添加一条:
<activity
            android:name=".Login"
android:exported="true" />最后运行该项目,此时app还不能正常运行,需要在手机Settings->Apps->My Application->Permissions中开启Storage权限。


